

Procedures for Removing and Installing Crane Wheels, Matching New and Used Wheels, and Load Testing
📌 Replacing crane wheels is a critical process in equipment maintenance, involving the entire workflow from disassembly and press-fitting to adjustment and load testing. Wheel replacement must be carried out in strict accordance with operating procedures, including end beam inspection and repair, the press-fitting process for new wheels, fine-tuning of installation tolerances, and test runs of the entire machine. This article provides a detailed overview of the criteria for determining when wheel replacement is necessary, the operational procedures, and the acceptance standards.
Wheels must be replaced promptly if their wear exceeds the scrappage standard (as determined by the maintenance team) or if defects such as cracks or flaking are present. When replacing wheels, strictly follow the operating procedures to ensure that the installation accuracy of the new wheels meets the required standards. The Krud Heavy Industries maintenance team is equipped with specialized tools and a laser total station for precision adjustments. This process involves not only disassembly and installation but also requires comprehensive consideration of the end beam’s condition, the compatibility between new and old wheels, and recalibration.
Determining When to Replace Tires
Wheels must be replaced under the following conditions: ① Tread diameter wear ≥ 5% of the original diameter; ② Tread spalling depth ≥ 3 mm or area ≥ 200 mm²; ③ Flange thickness wear ≥ 50% of the original thickness; ④ Any cracks appear at the flange root; ⑤ The hardened layer has been worn through (the tread hardness has dropped to the core hardness level); ⑥ Wear in the wheel bearing bore has caused the fit clearance to exceed the limit (>0.05 mm). Each wheel should be inspected and verified individually before replacement to avoid unnecessary replacements.
In actual engineering practice, a common mistake is to focus solely on tread wear while neglecting the condition of the flange. Thinning of the flange is often an overlooked risk factor—when flange thickness wears down from 25 mm to 12 mm, the risk of derailment increases approximately threefold. Additionally, when replacing a wheel, the wear condition of other wheels on the same end beam should be inspected simultaneously to avoid replacing only one wheel, which could result in mismatched wheel diameters and cause new rail gouging.
Requirements for Matching New and Used Wheels
When replacing a wheel, you must ensure that the new wheel is compatible with the other wheels on the same end beam:
Diameter Matching:The diameter difference among the four wheels on the same end girder must not exceed 1.0 mm, and the diameter difference among the eight wheels on the same crane must not exceed 1.5 mm. The diameter of new wheels should be slightly larger than that of the original wheels (0.5–1.0 mm) to compensate for the loss in diameter due to wear. Excessive diameter differences can result in uneven wheel load distribution.
Material Matching:The material and heat-treated hardness of replacement wheels must match those of the other wheels on the same side. For example, if the original vehicle uses 42CrMo induction-hardened wheels, do not mix them with ZG310-570 flame-hardened wheels when replacing them. The material of the drive wheel and the driven wheel on the same side must be the same.
Bearing Matching:The bearing model for the new wheel should match that of the original vehicle; we recommend using bearings of the same brand and series. When replacing a wheel, it is recommended to replace the bearing at the same time—since the old bearing has become deformed after being removed from the old wheel, the angular clearance cannot be guaranteed after re-press-fitting. Before installing the bearing, check the model, tolerance grade, and angular clearance to ensure they meet the design requirements.
Wheel Replacement Procedure
Disassembly:Raise the crane end beam to lift the wheels off the ground, then remove the wheel bracket cover plate, bearing housing bolts, and retaining rings. Use a specialized hub puller or hydraulic wheel puller to remove the wheel bearing assembly. When jacking up the vehicle, ensure the jack is positioned on the end beam’s reinforcing ribs to prevent localized deformation of the end beam caused by the jacking position.
End Beam Inspection:After removing the old wheels, inspect the wheel holes in the end beams for wear and deformation. Use an inside micrometer to measure the roundness and diameter of the bore. If the roundness deviation exceeds 0.05 mm or the diameter has increased by more than 0.10 mm, the bore must be reamed to restore it to its original dimensions. After reaming, measure the surface roughness to ensure Ra ≤ 3.2 μm.
New Wheel Installation:After cleaning and lubrication, new wheel bearings are installed on the wheel axle using a hot-mounting process (heating the bearings to 100–120°C in an oil bath or via induction heating) and allowed to cool naturally. The wheel assembly is then inserted into the end beam bore and pressed into place using a press. The pressing force is calculated based on the bearing bore diameter: approximately 0.5–1.0 kN per mm. The pressing speed is controlled to within 2 mm/s to avoid impact loading.
Fine-tuning:After installing new wheels, adjust the lateral runout, vertical runout, wheel alignment, and diagonal alignment in that order, with tolerances in accordance with GB/T 10183-2018. Adjust the lateral runout first, followed by the vertical runout, and finally verify the diagonal alignment.
Post-Replacement Load Test
After replacing the wheels, test runs must be conducted both with and without a load to ensure that the wheels are properly matched to the track, that the train runs smoothly, and that the load is distributed evenly across each wheel.
No-Load Test Run:The train ran for 2 hours without any abnormal noise or vibration. Record the current of the drive motors on both sides; the difference should be ≤10%. Use a stethoscope to check the sounds from each wheel bearing; the sounds should be uniform and continuous, with no irregular noises. Measure the flange temperature; under normal conditions, the temperature rise should not exceed 15°C above the ambient temperature.
Static Load Test:In accordance with TSG 51-2023, lift the vehicle to 1.25 times its rated load and hold it in that position for 10 minutes; verify that there is no permanent deformation of the wheels or end beams. After the static load test, check whether the wheels are in proper contact with the track and whether there is any localized loss of contact.
Dynamic Load Test:Lift 1.1 times the rated load and perform at least three full-stroke round trips; the crane must operate smoothly, without rail biting or abnormal noises. Immediately after the dynamic load test, measure the temperatures of the wheel tread and flange; the temperature rise should not exceed 30°C above ambient temperature. Record the crane’s lateral deviation during the test; the total deviation should be ≤8 mm. After the test, recheck the torque of all bolts to ensure there is no looseness.
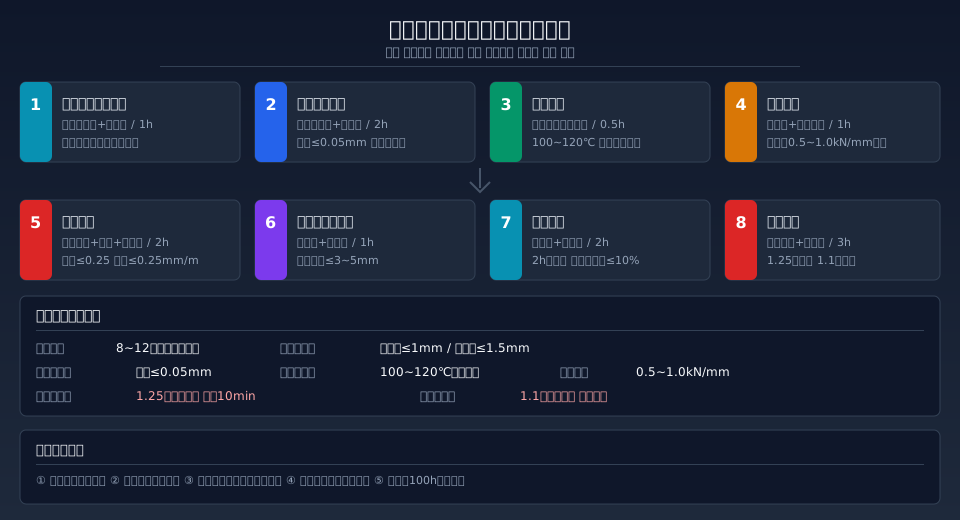
Wheel Replacement Procedure Comparison Chart
The following table summarizes the procedures, tools, acceptance criteria, and labor hours for the eight-step wheel replacement process, serving as a quick reference for Respeta during replacement operations.
| Steps | Procedure | Tools | Acceptance Criteria | Work Hours |
|---|---|---|---|---|
| 1 | Lift the end beam to remove the old wheel | Hydraulic Jack/Tire Remover | End beams are undamaged | 1h |
| 2 | End Beam Inspection and Repair | Internal Micrometer/Boring Machine | Roundness ≤ 0.05 mm | 2h |
| 3 | Hot Mounting of Bearings | Induction Heater | 100–120°C | 0.5 h |
| 4 | Wheel Press-Fit | Presses/Press-Fitting Fixtures | The applied force is consistent with the calculation | 1h |
| 5 | Skew Adjustment | Laser Aligner / Eccentric Sleeve | Level ≤ 0.25 mm/m | 2h |
| 6 | Diagonal Wheelbase Adjustment | Total Station / Steel Tape Measure | Diagonal difference ≤ 3–5 mm | 1h |
| 7 | No-Load Test Run | Ammeter/Stethoscope | 2h with no abnormalities; current difference ≤ 10% | 2h |
| 8 | Load Test Run | Test Load/Temperature Gun | 1.25 times the static load; 1.1 times the live load | 3h |
| Total | 8–12 hours (including test runs) | |||
Frequently Asked Questions
Q: Is it possible to replace just one wheel?
Answer: In principle, this is acceptable, but the difference in diameter between the new wheel and the other three wheels must be ≤1 mm. If the old wheel is worn to the point of being close to the scrappage standard, replacing it with a new wheel that is significantly larger in diameter than the other three will result in increased tire pressure on that wheel and accelerated wear. It is recommended to replace all four wheels on the same axle simultaneously, or at least in pairs.
Q: How long does it take to change a tire?
Answer: The total time required for a single-wheel replacement is approximately 8 to 12 hours (including disassembly, end beam inspection, hot mounting of bearings, press fitting, misalignment adjustment, and no-load and load test runs). If the end beam requires bore repair, add 2 to 4 hours. The Krud Heavy Industries maintenance team is equipped with specialized tooling and a laser total station, which can significantly reduce alignment time.
Q: Is it necessary to perform a load test again after replacing a wheel?
Answer: Yes. In accordance with TSG 51-2023, static and dynamic load tests must be conducted after replacing major load-bearing components (including wheels). Static load tests shall be conducted using 1.25 times the rated load, and dynamic load tests shall be conducted using 1.1 times the rated load. Test records shall be filed in the equipment’s technical records. A wheel maintenance record manual is provided with Krude Heavy Industry equipment upon delivery.
Q: What should I do if the locomotive still bites the rails after replacing the wheels?
Answer: If the wheels continue to bite the track after being replaced, this indicates that the root cause of the problem lies not with the wheels themselves, but with the track system. Inspection sequence: ① Check whether the track straightness exceeds the tolerance (should be ≤ 2 mm/2 m); ② Check the elevation difference between the two rails (should be ≤ ±5 mm over the entire length); ③ Check whether the rail joints are misaligned; ④ Check whether the end beams show torsional deformation. Track inspection and correction should be completed before replacing the wheels, and track straightness should be ≤ 2 mm/2 m.
