

5 Common Causes of Bridge Crane Gearbox Oil Leaks
5 Common Causes of Gearbox Oil Leaks in Bridge Cranes and How to Fix Them
Among gearbox oil leak failures in bridge cranes, input shaft seal wear (approximately 30%) and output shaft seal wear (approximately 25%) are the two leading causes, while a clogged breather (approximately 15%) is often overlooked. Most oil leaks can be resolved within 4–6 hours without stopping production by replacing seals and cleaning the breather — provided the issue is caught early. Running with oil level below the lower limit for more than 30 minutes can cause irreversible pitting damage to gear tooth surfaces.
The gearbox is the core transmission component of both the hoisting mechanism and the crane travel mechanism in bridge cranes. Oil leaks not only waste lubricating oil and contaminate the workshop floor, but more critically, they force gears and bearings to operate with insufficient lubrication, accelerating tooth pitting and bearing failure. According to GB/T 23201-2008 — Technical Specifications for Bridge Crane Gearboxes — and JB/T 9317-2015 — Gear Reducers for Cranes — no seepage is permitted at any sealing point when the gearbox operates under rated conditions. Below, we break down the five most common leak causes in order of failure frequency, along with the corresponding repair methods.
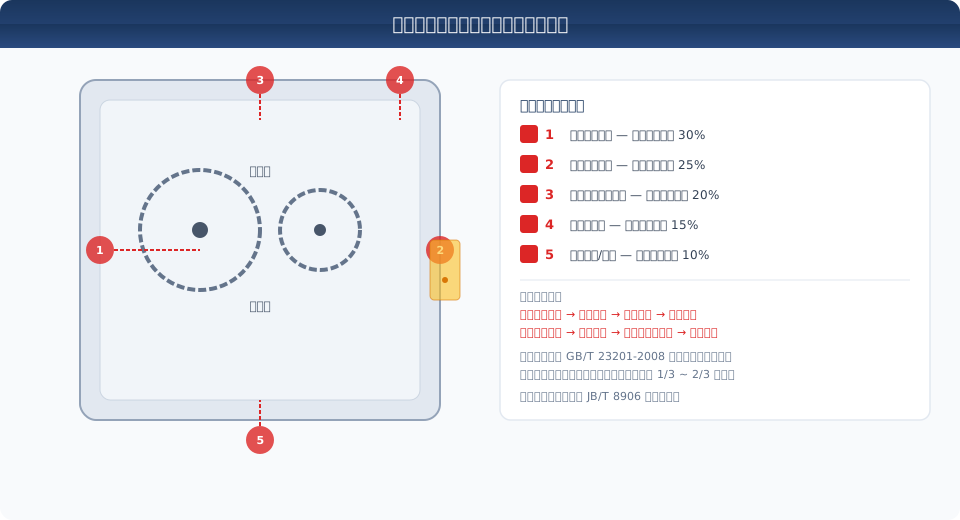
Five Common Gearbox Oil Leak Causes Explained
Gearbox oil leaks can be traced to five root causes: seal aging, improper installation, operating environment, maintenance neglect, and design defects. The following analysis is ordered by actual failure frequency, from highest to lowest:
Input shaft seal lip wear — This is the most common cause, accounting for roughly 30% of gearbox oil leak failures. The seal lip gradually wears under prolonged rotational friction. When the shaft journal surface roughness exceeds Ra>0.8μm or the seal lip interference drops below 0.3mm, lubricating oil seeps along the shaft journal. The high-speed shaft (input speed 750–1500 r/min) can reach a linear velocity of 3–6 m/s, with seal lip temperatures climbing to 80–100°C, causing the rubber material to harden and lose elasticity. Diagnosis: Wipe the area beneath the input shaft end cover with a clean white cloth. If oil residue appears and runs downward along the shaft, the input shaft seal has failed.
Output shaft seal eccentric wear due to radial load — Accounts for approximately 25% of leak failures. The output shaft bears radial forces from gear meshing plus additional bending moments caused by coupling misalignment, resulting in uneven wear between the journal and the seal lip. When coupling shaft alignment deviation exceeds 0.1mm or output-end radial runout exceeds 0.05mm, one side of the seal lip wears excessively while the opposite side fails to maintain contact with the journal, breaking the sealing interface. Output shaft leaks typically become visible after 3–6 months of operation, starting as seepage and progressing to dripping (1–3 drops per minute) within 2–4 weeks if left unaddressed.
Aging of the housing joint face gasket — Accounts for about 20% of leak failures. Paper gaskets or liquid sealant are used on the split-line joints between the upper and lower gearbox housings, as well as between end covers and the housing. Under repeated thermal cycling (shutdown cooling followed by operating temperatures of 60–80°C), the gasket gradually loses its elasticity. When bolt preload relaxes due to vibration (torque drops by 15–25%) and the joint gap widens beyond 0.05mm, oil seeps out through capillary action. The telltale sign is oil residue distributed circumferentially along the joint face rather than concentrated on one side.
Clogged breather causing internal pressure buildup — Accounts for roughly 15% of leak failures but is the most frequently overlooked during maintenance. As gears churn oil and generate friction heat during operation, the air inside the housing expands. The breather's job is to equalize internal and external pressure. In dusty environments (cement plants, foundries), the breather filter element becomes clogged with dust within 1–2 weeks. When internal pressure rises to 0.02–0.05 MPa, oil is forced past the seal lip — the seal itself is perfectly fine; the breather is the culprit. Inspection method: After shutdown, unscrew the breather. A hissing sound of escaping air confirms a blockage.
Drain plug and oil level gauge seal failure — Accounts for about 10% of leak failures. The copper gasket or combined sealing washer on the drain plug deforms and hardens after repeated removal and installation. The O-ring seal on the oil level gauge swells and fails after prolonged immersion in hot oil. Both leak points are located at the bottom of the gearbox, so oil drips directly onto the floor or equipment below and is easy to spot. This is the simplest leak to fix — replacing the sealing washers resolves the issue.
Gearbox Oil Leak Troubleshooting: Step-by-Step Repair Guide
When a gearbox oil leak is detected, follow this five-step systematic troubleshooting process to avoid unnecessary disassembly:
Step 1: Visual inspection — Clean the gearbox exterior, then run the unit for 30 minutes. Use a white cloth or test paper to check all five leak points. Seepage (surface wetness without dripping) and dripping (≥1 drop per minute) require different response priorities. Dripping demands immediate shutdown and repair; seepage can be scheduled for the next maintenance window.
Step 2: Oil level and condition check — Verify through the oil level gauge that the oil level is within the 1/3 to 2/3 scale range. An overfilled gearbox (above 2/3) increases oil churning, raises oil temperature, and builds internal pressure — itself a leak trigger. Also draw an oil sample for inspection: milky or emulsified oil indicates water ingress, requiring a check of the cooler or the working environment for water entry; black oil with metallic particles points to gear wear, meaning the leak may be merely a symptom of a deeper problem.
Step 3: Clean or replace the breather — Remove the breather and blow compressed air through the filter element from the inside out (never from the outside in, as this forces dust into the housing). If the filter is corroded or cannot be cleaned effectively, replace the entire breather assembly (cost: approximately $5–$12). Run the gearbox for 1 hour and observe whether the leak improves — a significant reduction or complete stop indicates the root cause was a clogged breather, not seal failure.
Step 4: Replace seals — Once seal or gasket failure is confirmed, use the following parameters: seal lip-to-journal interference of 0.5–0.8mm, shaft journal surface roughness Ra≤0.4μm, and apply grease to the seal lip during installation to prevent dry running and burning. Maintain coaxiality between the oil seal housing bore and the shaft within 0.05mm. For housing joint faces, apply oil-resistant sealant (e.g., silicone sealant rated for -60°C to +250°C) at a thickness of 0.5–1.0mm, then tighten bolts in a diagonal sequence in 2–3 passes to the specified torque.
Step 5: Test run and verification — After seal replacement, fill with lubricating oil to the standard level, run the gearbox unloaded for 2 hours, then under full load for 1 hour. Inspect all sealing points every 30 minutes. Return the unit to normal service only after confirming zero seepage. Re-tighten the housing bolts within 48 hours after the test run (hot tightening), as the sealant undergoes slight shrinkage under temperature effects.
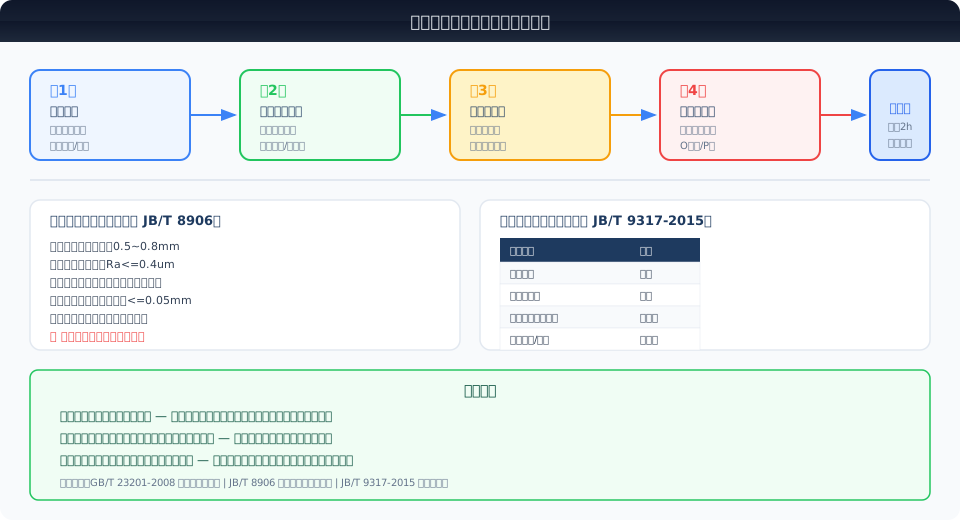
Repair Comparison by Leak Location
| Oil Leak Location | Common Cause | Repair Method | Repair Time | Cost Estimate |
|---|---|---|---|---|
| Input Shaft Oil Seal | Seal Lip Wear/Rough Journal Surface/Oil Seal Aging | Replacement Skeleton Oil Seal / Radial Shaft Seal, Journal Polishing | 2~3h | ¥80~200 |
| Output Shaft Oil Seal | Coupling Noshaft alignment/Radial Runout/Eccentric Wear of Oil Seal | Replace Oil Seal+Alignment Correction Couplingshaft alignment | 3~4h | ¥150~400 |
| Housing Joint Face | bow shackle Aging/Bolt Loosening/Thermal Expansion and Contraction | Clean Old Sealantbow shackle, Reapply Sealant | 4~6h | ¥100~300 |
| breather | Filter Screen Clogging/Internal Pressure Rise in Gearbox | Clean or Replacebreather | 0.5h | ¥30~80 |
| Drain Plug/Oil Level Gauge | Copperbow shackle Deformation/O-Ring Swelling | Replacementbow shackle Or O-Ring Seal | 0.5~1h | ¥10~50 |
Gearbox Oil Leak Prevention and Routine Maintenance
Most gearbox oil leaks can be effectively prevented through proper routine maintenance. Below are the key maintenance tasks organized by inspection frequency:
Per-Shift Inspection — Visually check all seal areas of the gearbox and the floor beneath for fresh oil traces. Verify the oil level is within the 1/3 to 2/3 range on the sight glass. A slow oil level drop (1–2 mm per week) is normal evaporation loss; a rapid drop (more than 5 mm per day) almost certainly indicates a leak point.
Weekly Maintenance — Remove the breather filter and blow out dust from the inside out using compressed air. In high-dust environments such as cement plants and foundry workshops, increase breather cleaning frequency to every 2–3 days. Wipe down the gearbox exterior with a clean cloth so fresh oil traces can be easily distinguished from old ones during the next inspection.
Biweekly Check — Use a torque wrench to check housing bolt torque in a diagonal sequence. If torque has dropped more than 20% below the rated value, retighten. Visually inspect the shaft journals at the input/output shaft oil seals for obvious wear grooves — if you can feel grooves with your fingertip, the journal is worn and requires laser cladding repair or installation of a wear-resistant shaft sleeve.
Semi-Annual Maintenance — Take an oil sample for laboratory analysis (viscosity, moisture content, acid number, NAS contamination level). If any parameter exceeds limits, schedule an oil change. The first gearbox oil change is performed after 200–300 operating hours (to remove metal particles generated during the break-in period). The normal oil change interval is every 2,000 operating hours or every 6 months, whichever comes first. Replace the copper gasket on the drain plug at each oil change.
Prohibited — Never wipe oil traces near rotating shafts with a cloth while the gearbox is in operation (entanglement hazard).
Prohibited — Never mix lubricating oils of different brands or viscosity grades — mixing can cause additive reactions, precipitation, and accelerated swelling or shrinkage of oil seal rubber.
Required — After every oil change, complete the Gearbox Oil Change Record Card, noting the date, oil brand and grade, quantity, and the person who performed the change. This record is essential data for tracking oil service life and identifying leak trends.
Frequently Asked Questions
Q: How do I distinguish between oil seepage and oil dripping from a gearbox, and how should each be handled?
A: Seepage means the seal area is damp but no oil drops form — oil level drops no more than 2 mm over 8 operating hours. This can be scheduled for repair at the next planned shutdown. Dripping means more than one drop per minute, which is a fault requiring immediate shutdown — if the gearbox runs more than 30 minutes with the oil level below the lower limit, irreversible pitting can occur on gear tooth surfaces. Refer to the criteria specified in ISO 4306 for assessment.
Q: The oil seal was replaced less than three months ago and it is leaking again. What could be the cause?
A: Recurring leaks are usually not the seal itself. Check three areas: ① Is the breather blocked? — This is the most commonly overlooked cause. Internal pressure buildup will push even a new seal out and cause leakage. ② Is the shaft journal surface roughness within spec? — Ra should be ≤ 0.4 μm. A journal with wear grooves will wear out a new seal within weeks, so the journal must be repaired first (laser cladding or a wear-resistant sleeve). ③ Is the seal model correct? — Same-specification seals from different brands can differ in lip material and interference fit. Select seals per the requirements of JB/T 8906 Seals for Cranes.
Q: How much oil should I put in the gearbox, and what happens if I overfill it?
A: The oil level should be between the 1/3 and 2/3 marks on the sight glass. Overfilling (above 2/3) increases gear churning resistance, raises oil temperature by 5–15°C, and increases internal housing pressure — all of which can trigger or worsen leaks. Correct filling procedure: wait 10 minutes after shutdown for oil to drain back, then slowly fill to the 2/3 mark, run for 5 minutes, recheck, and top up to the 2/3 mark. Follow the lubrication requirements of JB/T 9317-2015.
Q: Can a leaking gearbox be temporarily operated without shutting down?
A: For seepage-level leaks, some temporary measures can be taken while running: place a drip tray beneath the leak to prevent contamination of the floor and equipment below, check the oil level during each shift inspection, and top up as needed to keep the level above 1/3. However, be clear that these are temporary measures only — they buy 1–2 weeks at most. A gearbox leak will not heal itself; it will only get worse. Dripping-level leaks must never be operated without shutdown — stop the equipment and repair immediately. During temporary operation, monitor oil temperature closely; if it exceeds 90°C, shut down immediately.
The technical parameters and repair procedures in this article reference the requirements of ISO 4306 Bridge Crane Reducer Technical Specifications, JB/T 9317-2015 Gear Reducers for Cranes, and JB/T 8906 Seals for Cranes. All bridge crane gearboxes manufactured by Kelude undergo a 2-hour full-load running-in test before leaving the factory, and are only released when zero leakage is confirmed at all seal points.
